
Payloadz Express
If you simply want to sell a basic digital file online, consider using PayLoadz Express. PayLoadz Express is a 1-2-3 process that allows you to have your digital item for sale in a matter of minutes. For more information on using PayLaodz Express please visit this link:
http://payloadz.zendesk.com/entries/21533531-payloadz-express-overview
If you want for more advanced services such as account/product management, selling multiple items, shopping cart, multiple file delivery, features to offer free, donation-based products, subscription-based products, discounts and promotions, a software registration key delivery, control download link security, an affiliate system, please sign-up or upgrade to the PayLoadz Hybrid (Premium) account by following the steps below.
Payloadz Hybrid (Premium)
Getting started with Payloadz Hybrid (Premium) is easy. You'll be ready to start earning cash once the 5 simple steps listed below are complete. In depth instructions for each step follows below.
Step 1 - Get a free PayLoadz account at: https://www.PayLoadz.com .
Step 2 - Get a free PayPal account at: https://www.PayPal.com or Google Checkout at: https://checkout.google.com/sell (you can get and use both if you like).
-
Using PayPal - Set up your PayPal IPN (Instant Payment Notification) preferences. Next, set up your PayLoadz Profile with your Primary PayPal Email address.
-
Using Google Checkout - Set your Google Merchant information in your PayLoadz Profile, put the API Callback URL in your Google Checkout Account, create Google Checkout Purchase Buttons or Links and Contact Us to let us know when you start receiving sales through Google Checkout. (This is not necessary for PayPal).
Step 3 - Create a new product to sell at the PayLoadz Website.
Step 4 - Copy and paste the code generated into your web site.
Step 5 - Test your setup.
Below are the step-by-step details for the 5 steps listed above.
-
Get a PayLoadz Account
Visit the PayLoadz homepage at https://www.PayLoadz.com and sign up for an account by clicking on one of the “Sign Up” links found on our home page. You will be taken to a very simple sign up form that will create your account.
The only thing you will need is a working Email address and a password of your choosing. We strongly suggest that you choose a different password from the one used at PayPal. Your account creation is instant. An Email containing "Getting Started information" is sent to the address used as your user name.
The email address used as your user name does NOT have to be the same as your PayPal email address. After you submit the New User registration form, you will be taken to your Profile page. More information on how to complete your Profile pages is provided in Step 2. -
Get a Free PayPal and/or Google Checkout Account
Visit the PayPal homepage at: https://www.PayPal.com and sign up for an account by clicking on the “New Users” or “Sign Up” links on the homepage. Again, you will just need a valid, working email address to use as your Username and a password for secure access.
Important Note: You will need to sign up for either a Business or a Premier Account at PayPal, as a Personal account will not work. If you already have a Personal PayPal Account, you can easily upgrade to a Premier or Business Account. Finally, you must have a VERIFIED PayPal account before the system will work properly. Your account will say “Verified” on your account page after you have completed the PayPal verification process.
Set Up Your PayPal IPN Preferences
The PayLoadz system works in conjunction with the PayPal payment service by “talking” to each other through a web address after payments are made. This is a free optional feature found at the PayPal web site. Just follow the steps below to get your PayPal IPN preferences set up.- Log into your PayPal account. Then go to your “Profile” page by clicking on the “Profile” tab just under the top navigation.
- On the Profile page select "Selling Tools".
- You will see a link, “Instant Payment Notification”, click on that link and follow the instructions to activate the IPN in your account.
- When asked for a URL, enter the following PayLoadz URL http://www.payloadz.com/pay/index.asp, make sure Instant Payment Notification is set to enabled, save and exit.
Your IPN is now activated and your PayPal account is enabled to use the PayLoadz system.
The final step is to complete the link between PayPal and the PayLoadz system is for you to provide us with your Primary Email address that is used at the PayPal web site.
Enter this address in the PayLoadz system by logging in to your account and clicking on the “Account” link in the top navigation section, then select "PayLoadz Profile” link. Place the email address in the PayPal account section for the PayPal account type you are using. (Optional) While you here you can also fill out your profile to personalize your customer’s experience, however, the only required element is the PayPal Email address field.
At this point, the configuration between PayPal and PayLoadz is complete.
Google Checkout
You can register for a free Google Checkout account at the following address: https://checkout.google.com/sell
Follow the instructions at the Google site to create your selling account.
Set-up your Google Merchant information in your PayLoadz Profile
From the Google Checkout site obtain your Google Merchant information and enter that information in your PayLoadz profile. To obtain your information, go to the following address: https://checkout.google.com/sell/settings?section=Integration.
Be sure to make note of your Google Merchant ID and your Google Merchant Key. You will need to enter each of these values into your PayLoadz Profile.
Go to your PayLoadz Profile here: https://PayLoadz.com/account/profile.asp
Enter the values you obtained from your Google Checkout account and click the Update link at the bottom of the page to save the information.
The image below from Google Checkout shows the place to see your Merchant ID and Merchant Key.
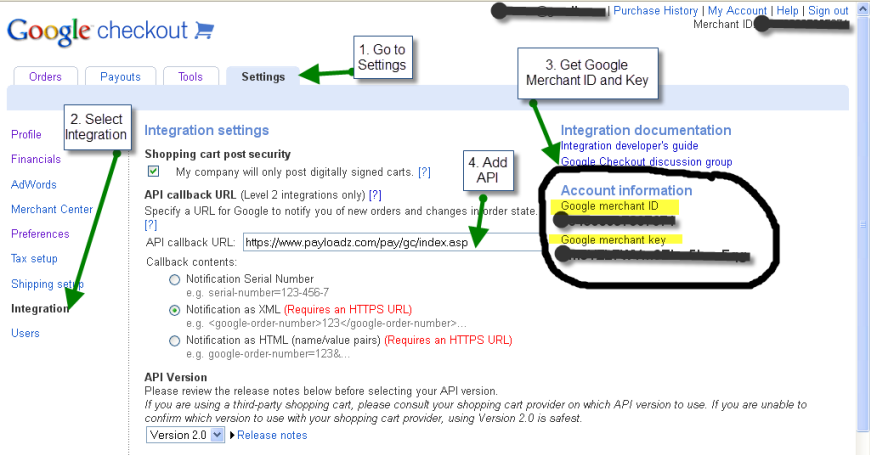
Put the API Callback URL in your Google Checkout Account
In order for our system to communicate with the Google Checkout system, you need to enter the Callback API URL into your Checkout account at Google. You can locate the API Callback URL setting here: https://checkout.google.com/sell/settings?section=Integration - Make sure you reference the image above from Google Checkout to find the location of the API Callback field.
Enter the following API Callback URL into the field on the Google Checkout account:
https://www.PayLoadz.com/pay/gc/index.asp
Click on the Save button to keep the URL entered. Finally, choose the XML format when asked to process orders using XML or named-pair values. The system is ready to use now. IMPORTANT: Be sure to select "Automatically authorize and charge the buyer's credit card" in your Checkout Preferences. Create Google Checkout Purchase Buttons or Links
Note: Under the Shopping cart post security header, uncheck the box to allow your account to use API requests with name-value pairs. After removing the check from the checkbox, click the Save button to save your settings. Contact us and let us know when you start receiving sales through Google Checkout!
Congratulations! You are now ready to begin selling digital goods on PayLoadz. Now that you are familiar with the account set-up we encourage you to explore the many other optional features you can use to create products, increase sales and enhance your customers’ buying experience. To learn more about these features visit Getting Started and Advanced Functionality.